A local business directory is a one-stop platform where you can easily navigate through services and popular businesses.
Such a directory undoubtedly benefits local and growing businesses by increasing visibility while helping people know about their area without relying on others.
Overall, a single, easily navigable platform makes business easier.
But creating such a directory requires some calculated moves where every bit matters. Fortunately, certain tools and software make things easier if you know how to use them. Suppose you are on the way to creating a business directory for a specific locality. In that case, this article can be a guide.
Getting Started with Your Local Business Directory
It all starts with decorating the outlook and interactivity of the directory. Picking the right theme is the first step to having a well-organized website ready for use.
Pick the Right Theme
The checklist of the right theme includes functionality, customizability, scalability, and user experience. You can opt for specific themes for local business directories to ensure all these.
For example, geo-based themes are popular for business listings, local services, and real estate. Integration of OpenStreetMap or Google Maps API facilitates easy search of locations of nearby businesses.
Geolocation filters are just a start. The interactive maps and radius search options can help users navigate their desired locations conveniently.
Apart from this, multi-vendor marketplace themes, classified and listing themes, niche directories, review directories, etc., are all helpful in their own way. Each of these types specializes in offering a particular type of benefit. The choices here will definitely depend on what the business is about.
Such amazing themes are available all over the internet. But most of the good stuff is paid. But it doesn’t mean there aren’t free yet top-notch themes!
OneListing, Reign, GeoDirectory, Vantage, and OceanWP are among thousands of free theme options to give your directory a professional yet engaging look.
Create a Local Business Directory Website
Get the Essential Plugins
Choosing the theme is step one. What follows is getting the plugins you cannot do without. Plugins keep your website user-friendly one way or the other.
Plugins firstly improve search functionality. You need more specific and tailored tools besides basic plug-ins such as Yoast SEO or Rank Math.
Options like SearchWP and FacetWP can allow more granular filtering with tags, categories, and custom taxonomies. GeoDirectory is another plug-in that does the same but with locations.
Storing lots of nuanced information like active hours and contact info can be tricky, but it’s very important. It’s made easy with plug-ins like ACF (Advanced Custom Fields), allowing you to create custom post types and fields for individual listings.
This way, directories can be easily customized to be full of necessary details on the display. WPForms and Gravity Forms can make the process easier by enabling front-end submission forms where business owners can input or update their listings without having to access the backend.
Some other specific plug-ins can make any directory comparably better. Such as,
- For reviews and rating: WP Review, WP Customer Reviews
- For social media integration: Shared Counts, Social Snap, Nextend Social Login
- For analytics: MonsterInsights, ListingPro
You may not want to bother with all these different options. It can be a pain in the neck. In that case, you can opt for aDirectory as your one-stop solution. It has all you need from a directory plug-in. Here’s how you get it installed.
Step 1: Log into your WordPress website with your admin username and password to navigate the dashboard.
Step 2: Once logged in, hover over the left-hand side of the dashboard and find “Plugins.” Click on “Add New” and go to the plugin installation page.
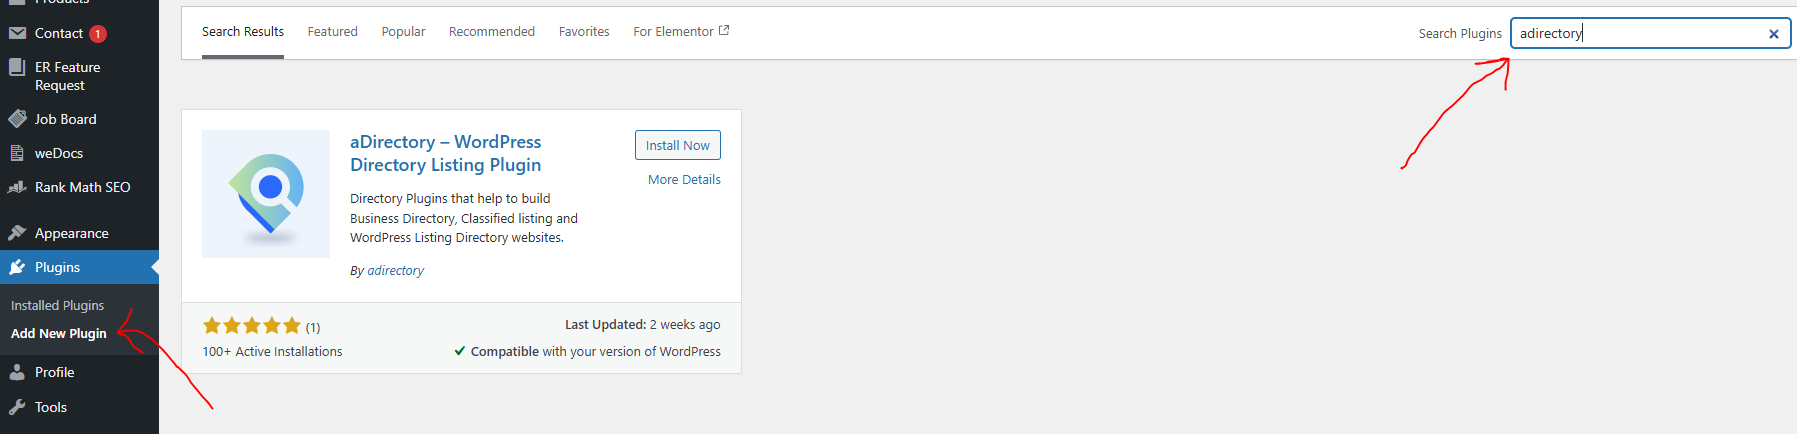
Step 3: You’ll find the “Search Plugins” box at the top right where you need to type in “aDirectory”. WordPress will display a few plugin options. aDirectory should be in that list titled “aDirectory – WordPress Directory Listing Plugin.”
Step 4: Click on the “Install Now” button next to the plug-in of your preference (the aDirectory in this case). This will kick-start the download and installation process of the plug-in. It can take anything from a few seconds to a minute or two.
Step 5: Once the plugin is installed, it’s time for activation. After the installation, the “Install Now” button beside the plugin’s name will change to “Activate.” Click on “Activate” to enable the plugin on your site.
Step 6: The activation will set a menu item labeled “aDirectory” in your WordPress dashboard’s sidebar. Clicking on “aDirectory” will take you to the plugin’s settings, and you can begin configuring the directory here.
Step 7: You will now encounter a “Setup Wizard” to help you customize the essential settings. Here, you’ll find the option to choose the type of directory you want to create, set up currency, country, default business category, listing durations for business, etc. All these will set up your page automatically. And remember, you can always modify these settings later, giving you the reassurance that you can adapt as your needs change.
Step 8: After you have configured the basic stuff, the plugin will start its course and create all the necessary pages such as listing, dashboard, and search page accordingly. All of these pages too are editable.
Step 9: At this point, you may need to get deeper into the plugin settings. For this, you simply have to go to “Settings” of the plugin. Here, you’ll find tons of customization and modification options. Readjust them in accordance with your need to add further sophistication to your site.
Director allows you to set up categories and tags, customize the front end, add new listings, and a lot more. You’ll learn more about all that along the way.
Get Your Directory Organized Through Categories and Locations
You may think the only benefit of adding categories and locations is making it easier for users to navigate your website. While this is true, it has some additional perks.
Let’s talk about categories first:
When your UX improves, it earns you points in terms of SEO. A well-defined category can significantly improve your website’s crawlability.
The mechanism is really simple here. By creating categories, you are creating a taxonomy. The search engine understands these things and takes them as a sign of quality. As a result, you get easy indexing and have an improved organic search ranking.
Segmenting businesses into proper categories can make your directory more scalable, enabling it to accommodate future growth without compromising performance.
Categorization also helps with filtered search, which increases personalization and relevance as well. Recommendation algorithms leverage these structured data to display only the relevant information to the target audience.
Having categories can also increase traffic to your site by improving SEO. As a result, you are likely to notice improved CTR. However, perhaps the most important benefit of categorization is analytics.
You can track the categories of your business that generate the most traffic, conversions, and user interactions. This valuable data helps scale up businesses in many ways.
Let’s check out how you can add categories to the directory.
Step 1: Plan out your category structure first. The categories must be relevant, clear, and comprehensive enough to cover everything your website has.
Along with categories, you need to have subcategories as well. For example, if you have “Restaurants” as the main category, the subcategory can be “Italian,” “Fast Food,” “Cafes,” etc. Such nuanced categorization provides an intuitive navigation experience.
Step 2: Once you have the categories mapped out, it’s time to begin the main task. This process starts from the administrative dashboard of your business directory platform.
Go to the admin dashboard and then to the business directory. There you’ll find “Categories.”
Step 3: Different business directory system comes with a dedicated section for managing categories. Use plugins like aDirectory to make the categorization process smoother.
To categorize in your website, go to “Business Directory” and here select “Manage Categories”. Or it can be titled as “Listings” as well. Once you get in, you’ll find “Categories” option.
Step 4: This is where you basically add a new category. If you use “aDirectory,” it’s likely to have an “Add Category” button to simplify it.
After clicking “Add Category,” insert the category name, add a short description of the category, and you are done.
If you need to add subcategories, repeat the process just by selecting “Add Subcategory” at the beginning.
Step 5: You can make some optional modifications to make the categories more detailed and specific. For example, you can add meta titles, meta descriptions, or keywords for your category. This optimizes your “Category” page for relevant searches.
What can be more helpful and convenient for users is adding images or icons with each category. Attach relevant visuals with the categories to make them easily recognizable to all users.
Step 6: Check if you have everything set accordingly. All good? Click “Save” or “Publish” to have the categories live.
Now, your job is to test and see if the categories work. They are? Good. Assign businesses to the relevant categories. You can easily do this in the “business listing” section, where you can add the businesses through the listing editor.
You can easily repeat the same process if you need to update it later.
Location-Based Listings Are Crucial as Well:
Locations are as important as categories and offer the opportunity to choose based on spatial relevance and personalization.
Most people look into local business directories primarily to find businesses with local relevance. A location-based listing can help identify services and businesses near the user’s locations. It overall offers personalized convenience.
Such a listing can help with filtering as well. In most cases, people don’t search with the business’s name. Rather, they either search with terms like “bakery near me” or “plumbers in Evanston, Chicago.”
A good geographical listing can filter through the options based on these cues and get the best result for the users.
Utilizing proper SEO tactics in these avenues can also boost the ranking game.
However, facilitating all these demands proper implementation of location-based listing within the directory. Here’s how it’s done:
Step 1: Start by thinking about which plugins you will use for location integration. While GeoDirectory and WP Local Plus are good options, specifically dedicated options like aDirectory can show better results.
Instead of plugins, you can use software like Joomla, Drupal, or Wix for their specific extensions that are made to be location modules.
Step 2: Now go to the admin dashboard to your local business directory. There, navigate to the plugin menu and search for your preferred plugins. Just put the name of the plugin you picked and search for it. Once it appears, click install.
Once it’s installed, click activate to have it on your site.
Step 3: It’s time to adjust things accordingly. Add a dedicated field for each location details for each of the businesses. These fields should ideally include:
- Street address.
- City.
- State.
- Postal code/Zip code.
- Country.
- Latitude and longitude.
- Type of business (very important).
Step 4: Try to integrate geolocation APIs with your plug-in. To do this, you’ll need to have Google Maps API first.
Once you have that, simply go to the settings of your plug-in, select the map option or option to manage the location, and then enter your Google Maps API key. This will enable a map of your business and add more sophisticated geolocation details.
Step 5: Now, fill in the fields mentioned in Step 3. Go to the directory, and under the option to add a new listing, fill in all the details. The address should be automatically plotted on the integrated map if the details you’ve input are accurate.
Don’t forget to save/publish the update before moving on to the next task. Otherwise, you can lose all the progress.
You can keep a form for the business owners or those interested in registering a location to smoothen the data recording process. Outsider contributions are often free but extremely valuable.
Step 6: Configuring location-based search filters will enable all users to search for specific locations effectively. To do this, you have to go to the settings on your plug-in and navigate to the search settings. There, enable the location option to activate it as a searchable filter.
You can make the searching experience more convenient by categorizing locations. Having specified categories, such as “California bakeries,” can make searches more effective for all users.
Organize Your Entire Directory with Listing Management
Any business directory is a collection of specific details of businesses or services. New businesses keep popping up here and there every day.
The specifics of these businesses change regularly as well. So, you need to keep updating the directory regularly.
The process of adding and updating listings is a piece of cake. Once you learn the adding process, you’ll figure out editing independently.
Here’s how to add listing to a business directory:
Step 1: Go to your WordPress dashboard by logging in with your credentials.
Step 2: You’ll need to access your directory plugin now. Here, navigate to directory content option and choose listings.
Step 3: Click on “Add New Listing” on the page. A form may appear where you must fill out all the necessary fields, such as the business name, description, category, location, and other relevant details.
If you want to kick it up a notch, add visuals like photos, gifs, and videos to make the items on the list more engaging.
Step 4: Remember the categorization bit? Those categories are going to come in handy now. Attribute each item on the list with a category while you are still updating items on the list.
Step 5: Now, simply complete the process by clicking on “publish” or “submit” or any similar button you may have, depending on your plug-in.
Now, your listing is on air. Go to the directory page of your website and check out the newly added listing to make sure all of it is looking alright.
Make Listing Easier with User Submissions over Manual Submissions
Yes, there’s no way of denying this is a hassle once you realize there are unlimited businesses. However, it can be easily mitigated by simply encouraging user-generated submission. However, it’s not easy to maintain.
Effective moderation is imperative to stay safe from spam and fake submissions. But it’s possible to properly enjoy the benefits of user-generated submissions if things are done right. Here’s a deep dive into how it can be done:
Start by Encouraging Submissions
Users will not put effort into putting in their details for no reason. You can lure them in by highlighting your promising benefits or having user-friendly forms.
User-friendly forms are easy to use and accessible. Having slots for unnecessary or long details can damage your site’s chances of getting frizz points. You don’t want that.
A good form has clear instructions on what information to provide to maximize the benefit of the users. Keep recommendations and tricks that will genuinely help them attract customers.
Lastly, try to offer incentives like limited boosting or discounts. Small things like this encourage users to contribute more.
Moderate the Submissions
You need to keep the submissions under constant surveillance. Wrong entries or incomplete submissions will make your directory appear suspicious.
The moderation part can be tricky as it demands your close attention. But, in the long run, it makes your site a place where people come for help.
What you can do is keep some pre and post-moderation options available. You can conduct a manual review to review each of the submissions before making it live.
The aim here is to make sure all the contents meet your guidelines. Email and IP address verifier plugins like ZeroBounce and Akismet can help filter out spam submissions.
But sometimes you can be wrong as well. That’s why it’s better to have post-moderation strategies ready. It’s quite simple.
Just keep the option to allow users to report submissions that they find inappropriate or inaccurate. You can also keep an upvote/downvote system like Reddit to keep the recommendations more informed.
With minimal effort, these steps can help your website host authentic and helpful data on your directory.
However, just approving and declining submission is not the end of it. You should offer clear and transparent feedback about why certain content or submissions were removed or not approved. Otherwise, you can lose a large number of users.
Most importantly, everything must be kept in constant moderation. This is the only thing that can keep your directory up and running with high-quality content and information.
Customize Your Directory: What and Why?
Listing gets the necessary contents ready for use. But making these contents appealing and engaging is as important as any other thing. Configuration and customization of the directory do this task of increasing traffic effectively.
Configurability gives you the full freedom to adjust the features and settings of the directory per user expectations. It means you can be creative here and instill unique, user-friendly features.
Not only features but redesigning the outlook and the directory’s functionality can help facilitate a unique user experience.
Optimization of performance through recalibrating, adding, or eliminating features helps with scalability as well. It can generate more traffic and effectively handle a large amount of data as your business grows.
Most importantly, the ability to customize is most fruitful regarding security. You can adjust and instill certain security features depending on the situation and requirements of your site.
Now, let’s see how you can access the directory building and make all these adjustments.
Step 1: Again, just like any other of the processes, go to your WP dashboard.
Step 2: Go to your directory dashboard. To do this, you must go to the plugin you are using and access its dashboard.
Step 3: Here, you’ll find the directory builder. It can be of a different name, but you’ll be able to easily figure out the button that launches builder.
Step 4: This is where your adjustments, customization, and configuration begin.
You can add or edit the listing according to your needs. All the details can be changed from this point on.
The layouts, too, can be adjusted here to enhance convenience. For example, you can change the listing arrangements, add or eliminate a section, or modify the design elements.
Most importantly, this is where you can configure various aspects of the directory, such as the search options, the display settings, and the user permissions.
Step 5: Once done with reconfiguring and the adjustments, go through the changes you’ve made one more time to ensure everything is set accordingly.
If everything seems good, publish the page to make it live for users.
This should be a continuous and routine process. Regularly update and reconfigure the settings to keep your directory relevant and functional. This practice can also help you inspect if everything is functioning properly.
Some Extending Functionalities You Can Add to Scale Up Traffic
Till now, you only have the basics ready for your directory. The features and all you’ve incorporated make your directory similar to any other alternatives.
To succeed, you must make your directory stand out by adding extended functionalities.
Here are some unique features you can consider:
- Booking and Appointment System: You can integrate an engaging booking system with third-party tools like Calendly or Acuity Scheduling. Having software like Google Calendar synced helps make real-time availability checking super easy. Most importantly, keep a cancellation and rescheduling feature that’s easy to access and works 24/7. This one of the most requested features will surely make the user come back again for the sake of convenience.
- Business Opening Hours: Displaying business hours is basic, but many don’t do it. Have the opening and closing hours mentioned for each day of the week? You can also have a calendar where users can select the date and see your active hours for that particular day. This way, you can conveniently communicate even if you are on holiday or have temporary closures. Keep time zone support with an automated conversion system if your business functions internationally. This will allow your users to see the active hours in their local time zone and make plans accordingly.
- User Interaction Features: Having a live chat service is common. But you can do more with it. While tools like Tawk. to and Zendesk simplify real-time chat, you can take it up a notch. Allow your users to chat over audio and video calls. Zoom, Google Meet, or Telehealth can be good tools to make communication easier. Video consultation makes communication more interactive and helps to gain trust quickly.
- Have Job Listing: While you have the details of the businesses ready for users, you can keep a section for the job openings if they have any. This will make your site a multi-purpose one. Local freelancers and job seekers can get opportunities while they are on the lookout for services they need. This can be especially helpful for those who have recently relocated and do not know the first thing about the new place.
Apart from these, you can also keep a customer loyalty program, content marketing through blogging and vlogging, and allow multivendor supports to keep users engaged in diverse ways.
Here are Some Monetization Strategies for You!
You can generate a substantial amount of revenue from the local business directory. The quality and unique features of your presentation will bring in users. As traffic keeps coming, you will eventually be able to tap into multiple income streams.
Look at some of the most popular and effective key monetization tactics.
Selling Listings
Selling premium listings is a classic way to generate more income from a directory. Just like any other service, basic listing can be free. At the same time, premium options can offer more visibility with enhanced engaging features and priority placement.
This strategy succeeds when there’s a clear distinction between basic and premium services.
You can keep a basic listing of all of the very basic information. In contrast, the premium listing can have the option to add more details, from textual to visual.
While these premium features will be based on a subscription model, you can keep the opportunity to feature a listing for additional fees. This way, a user can limit their business to a simple one-time fee without getting a subscription.
Offering Advertising Space
The ad revenue market never fails. Businesses on directories are always ready to increase the visibility of their service through ads.
You can utilize this opportunity to have banner ads for sale. Have these banner ad spots on the high-traffic areas of the directory to make these ads effective and thus more in demand. These high-traffic areas can be the homepage or the category posts.
You can also have sponsored listings as well. This way, a new business can get the opportunity to grow while getting you a bit of extra income. Ad networks like Google AdSense can help you with this.
However, don’t take all the advertising opportunities. For example, avoid pop-ups or side ads. This can be annoying to users, and it can cost you precious traffic.
Sell Leads
Lead generation has been profitable since the beginning of business. Businesses will pay you tons of money for customer inquiries and leads, as this is how to tailor services.
You can charge businesses for these inquiries on a pay-per-lead basis. Some may prefer to get the details of customers interacting with their business. However, new startups and aspiring businesses may want exclusive leads that you can get from the overall analytics of the visitors. You can sell these leads at a higher price.
Selling verified leads can be most profitable in this case. You can verify, filter, and categorize leads to enhance their quality. The target of these quality leads can be the big fishes who’ll pay a nifty amount for the data.
Offer Booking Services
Incorporating booking facilities helps businesses become more engaging, adding convenience to the customer’s experience. But how can you earn from it?
Booking fees are a good source of revenue.
Your directory can charge businesses a percentage of booking fees for each booking made through the directory. If you feel the percentage won’t cut, you can always set a flat fee per booking.
If you invest a bit in developers, you can maintain a whole booking management system to simplify booking, cancellation, and rescheduling for users and customers.
Make this tool subscription-based, and you can generate a bit extra cash while helping your business grow.
Percentage from Ticket Sales
Kinda similar to the booking fee, you can earn a percentage from ticket sales. Remember that this strategy is most effective for event-heavy industries like entertainment, workshops, or training programs.
Similar to the way it was with booking services, you can either charge a small percentage or a fixed amount on every ticket sold through your directory.
To scale up revenue through this method, you should look for partnering opportunities with exclusive businesses to hook up in-demand events.
In addition, you can charge an amount from growing businesses to promote the events they plan to launch. It offers a better chance of income generation, and event promotion holds great promise for small and growing businesses.
Few Last Words
From selecting the right themes and essential plugins to organizing listings, creating a local business directory demands nuanced approaches.
The option to customize the platform gives you the boundless opportunity that you can exploit to facilitate a more enhanced user experience with interactive features and by ensuring proper moderation.
Your consistent dedication and creative ideas can make your directory a success, creating an avenue to generating lucrative income. All it takes is taking the first step.
If you are new to the process or are facing challenges on this journey, feel free to reach us, and we’ll make sure you get that directory up and running in no time.